ShopDreamUp AI ArtDreamUp
Deviation Actions


Suggested Deviants


Suggested Collections


You Might Like…


Description
How to Make Chainmail
"The Basics" - Continued
Part Two: Preparing the Rings
This step deals with creating the actual rings of the Chainmail. This step requires a little experimentation. As always, I can show you what works for me, but you'll need to work at it and experiment to find out what works for you. All metalworking is not an exact science, regardless of how precise it is. Everything is approximate. Unlike precision machining, however, methods can vary slightly, and as long as the product is satisfactory at the end of the day, it doesn't matter which ones you follow.
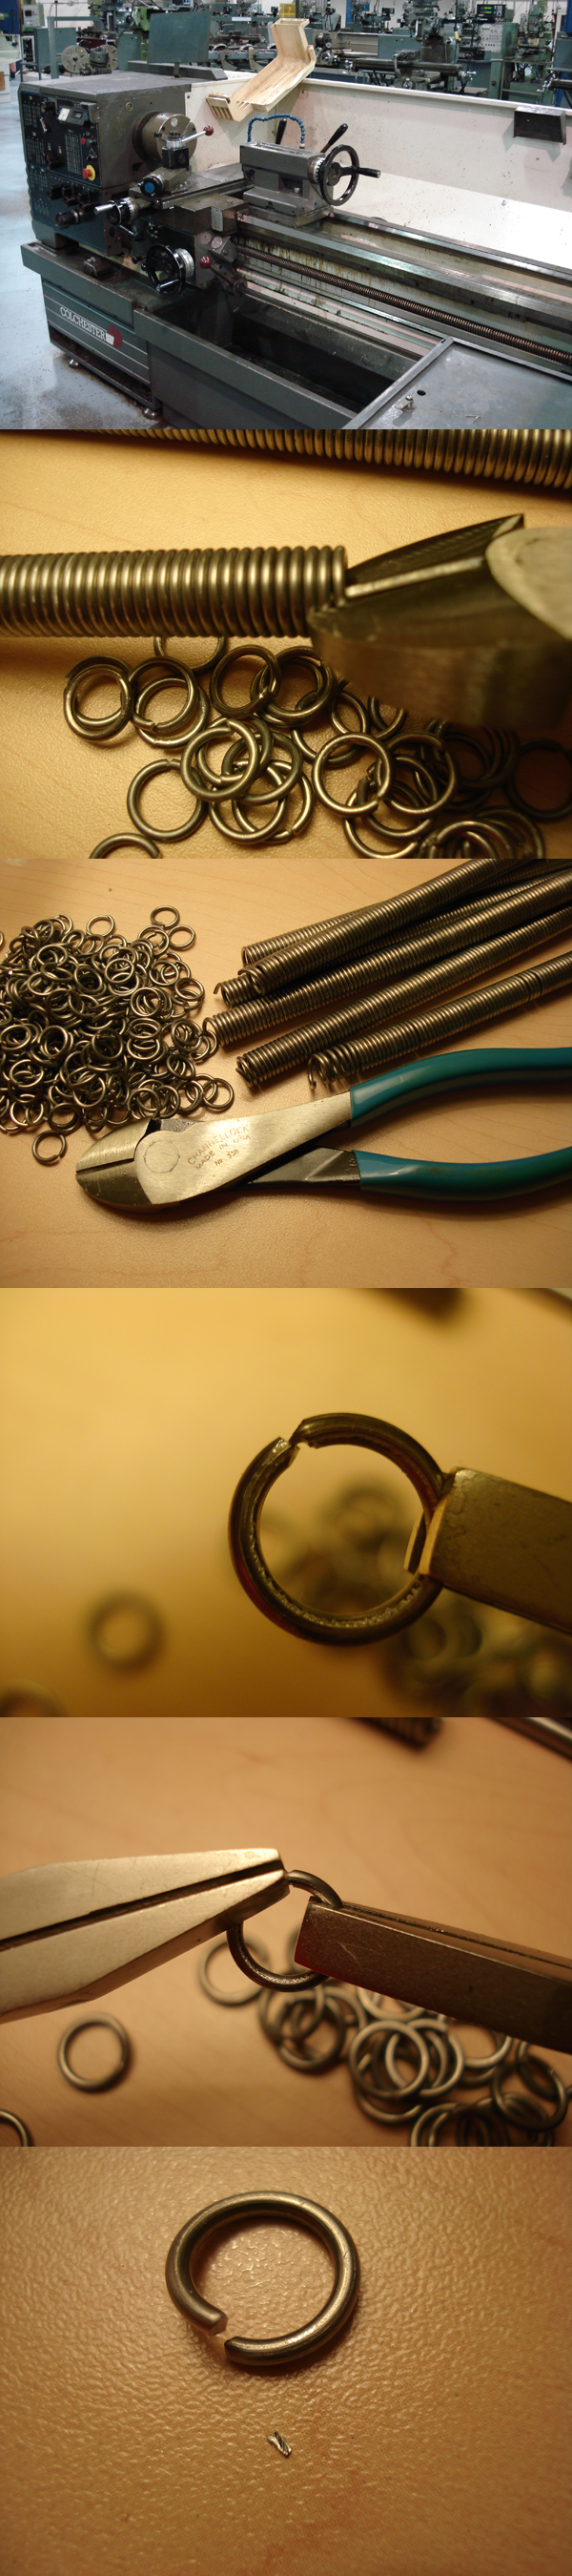
Step One
Actually, this isn't a step, this is a picture of the lathe and I'll offer some hints to those who want to use one to wrap their coils.
I had taken everything down when I snapped this photo after the day's clean-up. This is how I make the coils and it's quite effective, if not very risky and dangerous. The long bed of the lathe allows me to use a mandrel over three feet in length, but that doesn't mean you should. The mandrel flexes quite a bit with each rotation, and if you're not careful, it's easy to pull it clean off the tailstock.
Pictured here is a three-jaw chuck, but that doesn't stop me from using a collet. Either can work very well, but I had the three-jaw chuck installed, so I just used that. Because the mandrel is very thin and easy to bend I always center drill it first and put a live center at the tailstock.
Move the carriage out of the way first, as far back as you can, and swing the compound rest out of the way if possible. You can use the automatic feed and the tool post as a guide, however, but I generally don't bother with that.
It's natural for the mandrel to bend quite a bit, but not so much you pull it free from the center. What I like to do is lock the center in place and extend the tailstock spindle so it warps a tiny bit to compensate. Since this time you can't use a steady rest or a follower rest, if you're using a thinner mandrel, you'll just have to settle for making shorter coils.
I generally turn at a speed of about two hundred revolutions per minute, which is relatively fast for this application. That doesn't mean you should; I reccomend starting at a quarter of that. Two hundred revolutions per minute, with a 5/16" mandrel means I have to feed in about a hundred ninety-six and a quarter inches of wire each minute, so in other words three and a quarter inches per second. It's easy to mess that all up and botch the coils and waste a lot of material, or worse, get sucked into the machine when you're going that fast. What I do is put the spool of wire on a round object, such as the chuck wrench, hold it loosely with my fingers, applying pressure to the edge of the reel using my thumb to keep tension steady. I only hold it loosely, so in case it suddenly gets pulled in, I don't get pulled in with it. I hold the cutter in the other hand, and engage the clutch in reverse so it coils in a clockwise direction. When it reaches the end I cut it off quickly, then disengage the clutch.
If you have just a coil of wire and no spool for it, then things get a little hairy. Get on an abrasion-resistant glove, and keep it a safe distance from the machine, with one hand. Keep the other hand on the clutch, or if you have it, one foot on the foot brake. Slow the spindle speed down to fifty and don't go any higher than 100 revolutions per minute. This particular lathe has an automatic spindle brake which stops the spindle quickly if I disengage the clutch, and many of the others in the shop have emergency foot brakes. That doesn't mean yours will. Be careful.
Step Two
Cut the rings like so using the cutters. You should position them at a slight angle to compensate for the helix angle of the coil, so the rings form complete loops, leaving no open space.
Some people have suggested using a dremel to separate the rings. I suggest against this. The dremel's cutoff wheel will leave slight gaps in the rings and will burr them terribly, making the chainmail sharp and likely to scratch, cut or snag on the wearer's clothing or his or her skin.
Step Three
Continue cutting until you have a nice pile of rings.
Step Four
Look at how the rings are in this closeup. Because of the blades of the cutters, you'll notice they have a slight burr to them. This is dangerous and if it scratches you, will hurt. A lot. Examine them carefully first and test them with your finger.
Step Five
Grasp the little flange left by the cutters with your pliars and twist sharply. You may need to repeat this for the other end. You will, however, need to do this for every link in your project. Now would also be a good time to deburr them with a file if you need the extra assurance they won't be sharp or cut you.
Step Six
Test the links again. You should feel no sharp burrs at all. Notice that there's a tiny shard of metal next to the link in this picture - that's the burr I cut off the piece. I reccomend in fact grabbing the burr and placing the other end of the pliar onto the external diameter of the wire itself so a large chunk comes off, taking the burr with it and leaving the end of the wire blunt.
Next up, forming the pieces.
[link]
"The Basics" - Continued
Part Two: Preparing the Rings
This step deals with creating the actual rings of the Chainmail. This step requires a little experimentation. As always, I can show you what works for me, but you'll need to work at it and experiment to find out what works for you. All metalworking is not an exact science, regardless of how precise it is. Everything is approximate. Unlike precision machining, however, methods can vary slightly, and as long as the product is satisfactory at the end of the day, it doesn't matter which ones you follow.
Step One
Actually, this isn't a step, this is a picture of the lathe and I'll offer some hints to those who want to use one to wrap their coils.
I had taken everything down when I snapped this photo after the day's clean-up. This is how I make the coils and it's quite effective, if not very risky and dangerous. The long bed of the lathe allows me to use a mandrel over three feet in length, but that doesn't mean you should. The mandrel flexes quite a bit with each rotation, and if you're not careful, it's easy to pull it clean off the tailstock.
Pictured here is a three-jaw chuck, but that doesn't stop me from using a collet. Either can work very well, but I had the three-jaw chuck installed, so I just used that. Because the mandrel is very thin and easy to bend I always center drill it first and put a live center at the tailstock.
Move the carriage out of the way first, as far back as you can, and swing the compound rest out of the way if possible. You can use the automatic feed and the tool post as a guide, however, but I generally don't bother with that.
It's natural for the mandrel to bend quite a bit, but not so much you pull it free from the center. What I like to do is lock the center in place and extend the tailstock spindle so it warps a tiny bit to compensate. Since this time you can't use a steady rest or a follower rest, if you're using a thinner mandrel, you'll just have to settle for making shorter coils.
I generally turn at a speed of about two hundred revolutions per minute, which is relatively fast for this application. That doesn't mean you should; I reccomend starting at a quarter of that. Two hundred revolutions per minute, with a 5/16" mandrel means I have to feed in about a hundred ninety-six and a quarter inches of wire each minute, so in other words three and a quarter inches per second. It's easy to mess that all up and botch the coils and waste a lot of material, or worse, get sucked into the machine when you're going that fast. What I do is put the spool of wire on a round object, such as the chuck wrench, hold it loosely with my fingers, applying pressure to the edge of the reel using my thumb to keep tension steady. I only hold it loosely, so in case it suddenly gets pulled in, I don't get pulled in with it. I hold the cutter in the other hand, and engage the clutch in reverse so it coils in a clockwise direction. When it reaches the end I cut it off quickly, then disengage the clutch.
If you have just a coil of wire and no spool for it, then things get a little hairy. Get on an abrasion-resistant glove, and keep it a safe distance from the machine, with one hand. Keep the other hand on the clutch, or if you have it, one foot on the foot brake. Slow the spindle speed down to fifty and don't go any higher than 100 revolutions per minute. This particular lathe has an automatic spindle brake which stops the spindle quickly if I disengage the clutch, and many of the others in the shop have emergency foot brakes. That doesn't mean yours will. Be careful.
Step Two
Cut the rings like so using the cutters. You should position them at a slight angle to compensate for the helix angle of the coil, so the rings form complete loops, leaving no open space.
Some people have suggested using a dremel to separate the rings. I suggest against this. The dremel's cutoff wheel will leave slight gaps in the rings and will burr them terribly, making the chainmail sharp and likely to scratch, cut or snag on the wearer's clothing or his or her skin.
Step Three
Continue cutting until you have a nice pile of rings.
Step Four
Look at how the rings are in this closeup. Because of the blades of the cutters, you'll notice they have a slight burr to them. This is dangerous and if it scratches you, will hurt. A lot. Examine them carefully first and test them with your finger.
Step Five
Grasp the little flange left by the cutters with your pliars and twist sharply. You may need to repeat this for the other end. You will, however, need to do this for every link in your project. Now would also be a good time to deburr them with a file if you need the extra assurance they won't be sharp or cut you.
Step Six
Test the links again. You should feel no sharp burrs at all. Notice that there's a tiny shard of metal next to the link in this picture - that's the burr I cut off the piece. I reccomend in fact grabbing the burr and placing the other end of the pliar onto the external diameter of the wire itself so a large chunk comes off, taking the burr with it and leaving the end of the wire blunt.
Next up, forming the pieces.
[link]
Image size
600x2700px 2.46 MB
© 2008 - 2024 DaveLuck
Comments2
Join the community to add your comment. Already a deviant? Log In
You really don't want to use diagonal cutters for this -- it leaves a ganky edge on one side.
Consider getting some shear cutters.
Consider getting some shear cutters.