ShopDreamUp AI ArtDreamUp
Deviation Actions


Description
How to Make Chainmail
"The Basics"
Intro
Welcome to my tutorial on how to make chainmail. This particular tutorial deals with the basics of chainmail making and is intended to help those who have little or no experience with wire and metal work get started on their very own projects. Hence, the tougher patterns will not be covered in this tutorial.
Disclaimer
This tutorial encourages and reccomends the use of machine tools such as the engine lathe and drill press. Although I offer tips on the use of the engine lathe, these tips are offered only as hints to help out those who have already been trained in the use of machine tools. No internet guide, however detailed, can be a substitute for formal training and experience. I, Colchester, or any third parties take no responsibility for any injuries, death, or disfigurement resulting from the use of their products or guides.
Getting Started
In order to get started, you're going to need a few things.
A) Lots of time. Chainmail making is tiresome and often time-consuming, so it's best to set aside lots of time if you want to get anything done. This is often very obvious, but it's so obvious it's easy to overlook it and end up quitting halfway through when you realize your project might take more time than you anticipated. Always get lots of time.
B) Wire. I reccomend Aluminium wire for those who are just starting out. It's soft, it's forgiving, doesn't rust, and most importantly it's easy to work with. Steel wire has a certain springiness to it and is difficult to cut for the newcomer. Go to your nearest hardware store and buy a reel or two of fourteen-gauge (14ga) Aluminium fencing wire. When measured with a micrometer it is 0.0625" in diameter or so, but it will vary slightly. The particular wire I am using measures exactly 0.0636" in diameter, but it doesn't make much of a difference. Just ask for fourteen gauge and make sure it says fourteen gauge. Also, make sure it's Aluminium. Starting out with steel wire can get discouraging quickly, seeing as steel is more difficult to work with. Thinner or thicker wire can get difficult faster. Thinner wire is harder to hold together, and thicker wire is harder to work with. Fourteen gauge is a nice medium. Although other metals, such as steel, bare, coated, and galvanized, stainless steel, brass, and in some cases Titanium are available, Aluminium I've found is the best all-around for costuming. It's light, it's fairly strong and holds its shape, it's easy to work with, and unlike steel, doesn't require protective oils to prevent it from rusting.
C) Wirecutters. I reccomend Channellocks, and in one of the later pictures you can see the blue handles, but unless you're going to be using them every day cutting tough materials like stainless steel and Titanium wire and need to depend on them to get your job done, or have about fifty bucks sitting around, go with the cheaper ones.
D) Pliars. You'll need two pairs of pliars. Get two of the little blunt ones without teeth, like the ones I have in the pictures. Some of them have springs, which helps make things easier.
E) An object you can use as a mandrel or an arbour. If you're going with 14 gauge wire, use a 5/16" mandrel. The smaller your mandrel is in diameter, the tighter the rings are going to be and the finer the mesh that they form, but the more difficulty you'll have putting them together. 5/16" is a nice, comfortable width and looks pretty, it's what I have pictured here, although I've worked with 3/8" and 3/16". 3/8" produces very large, loose rings, and 3/16" produces extremely tight rings. 5/16" is the minimum for 6-through-1 weave, although 6-through-1 is not going to be covered in this tutorial. Regardless, I recommend 5/16" for everyone starting out. What I have in this tutorial is premium AISI W-1 Tool Steel in its annealed condition, centerless ground. However, when you're just starting out, you don't really need to spend the extra money, so just get a piece of mild steel rod 5/16" in diameter, about two feet long. Usually this will be available at your local hardware supplier as well.
F) A variable-speed electric drill, something to turn the mandrel, or a lathe. This part is optional, but will shave hours and hours off your production, especially if you intend to create lots of chainmail, and a drill can come in handy for preparing the mandrel. What I like to do is use my lathe to turn the mandrel and let the wire coil around it. I don't reccomend that to anyone just starting out, though. Coil by hand at first, then learn to use the drill and get a thorough understanding of how it works and how finicky the process is. Don't attempt to use a lathe to coil the wire unless you've already recieved training for it and can coil the wire proficiently on a drill. If you want to satisfy your inner engineer (or want to avoid blisters and sore wrists), challenge yourself, build a crank for your mandrel and something to hold it down.
E) A small metal file and mid-grade emery cloth. This is optional, but if you want to use your chainmail as jewellry or want to avoid it snagging, you'll need it to deburr the links by grinding or filing off all sharp edges. Don't use a dremel for this, the dremel is apt to leave burrs and edges on the rings itself.
F) Somewhere comfortable to sit and work, and your imagination and creativity.
Part One: Preparing the Coils
Because of the relative simplicity of chainmail, each step you take is very important, and one of them is forming the rings. I've tried using flattened springwashers, and they don't work, they have too high a wire thickness tointernal diameter ratio, and the result is they just don't fit together. So the only alternative is to make your own.
I made these coils on a lathe, and you can see it in the next step. However, I reccomend you start coiling by hand, then by using a variable speed drill first of all. The lathe method, while awesome for producing lots of rings in a hurry, is extremely dangerous to an inexperienced user. My Colchester has fifteen horsepower driving the chuck and will not stop unless the clutch is disengaged. It could suck you in before you could do that and being pulled into a chuck being driven forward with enough power and speed to dramatically rip chunks of metal with the ease of a kid peeling a banana is not good for your health.
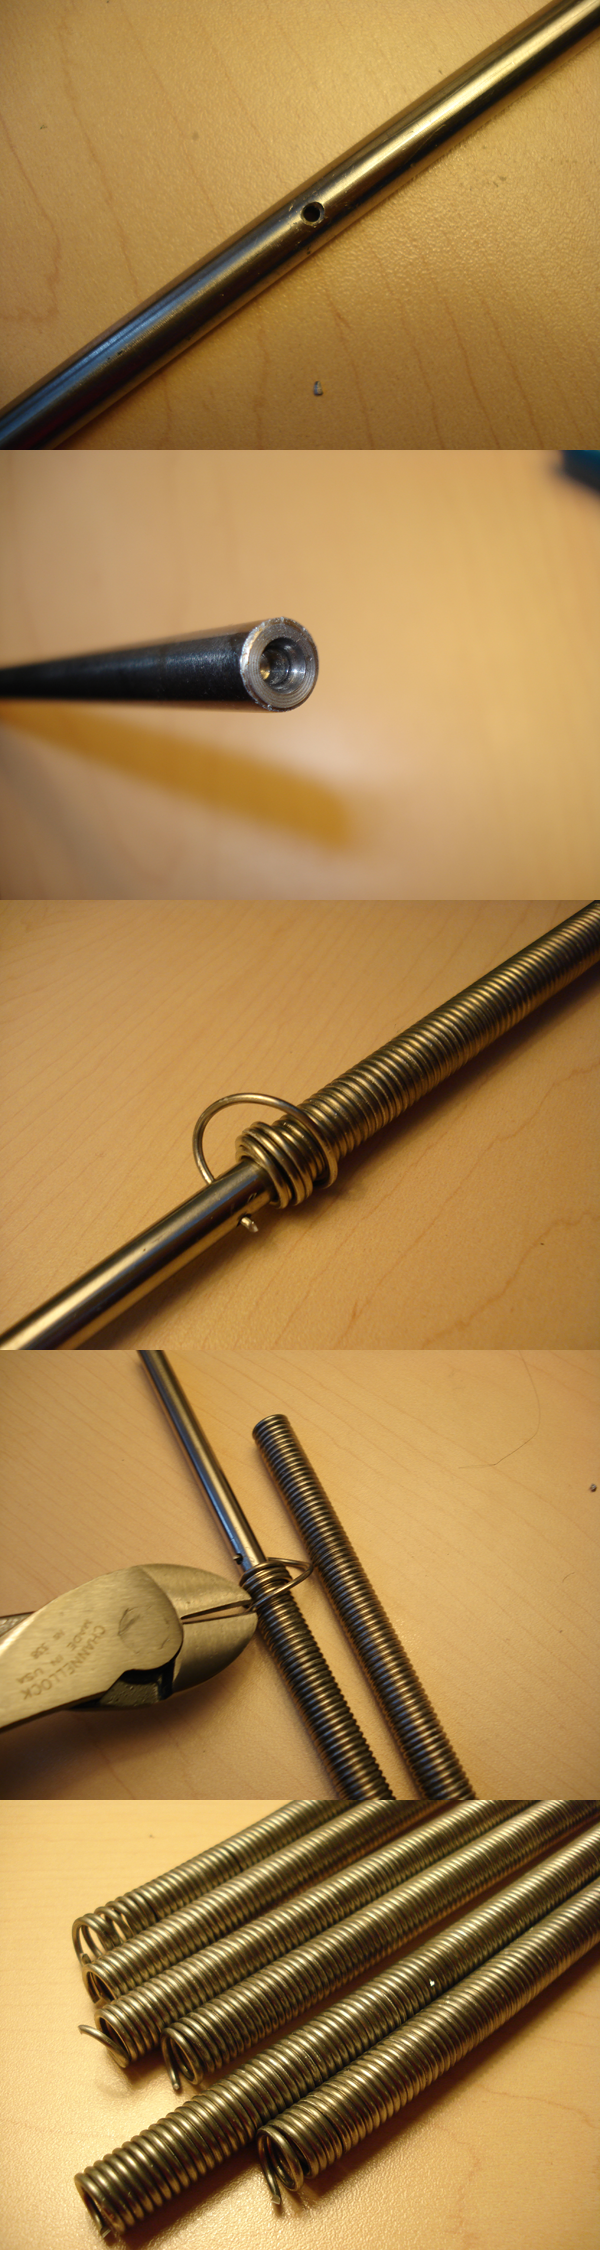
Step One
First get your mandrel, find the maximum, and drill a hole in it just large enough for the wire to fit through. Don't attempt to do this with a hand drill, use a proper drill press. I use a 3/32 drillbit, with a #2 center drill to create a pilot hole. When using the center drill I just touch the countersink, I never proceed up it. Once the hole is drilled, the wire can fit in it.
Step Two
This step is only mandatory if you intend to use a lathe. If you're doing this, might as well pop the extra bucks and buy tool steel instead of cold rolled steel. Keep in mind tool steel can be over three times as expensive as cold rolled steel, sometimes more. I center-drilled this using a #3 center drill. Although methods vary, I personally go no farther than halfway up the countersink when center drilling, otherwise the result is contact with the center will be minimal and excess friction on the edge and wear will be the result. But if you're using a lathe, you should recieve formal training on it.
Step Three
With the wire inserted into the hole you drilled, begin twisting. Keep the tension on the wire steady as much as you can. If you're twisting by hand, you don't need to create very long coils, as the coils tend to compress and the end result is that after you've coiled a few inches or so you'll begin to expend more energy into taking up that springiness instead of coiling the wire. Aluminium has less of this than steel, but still rebounds. I made these coils on a lathe. Again, coil by hand first, then learn to do it on a drill before you try it on something with fifteen horsepower. Keep your coils small at first and remember to strive for consistency, not speed. There's no sense in blazing through this step only to realize your rings have come out lopsided and the material has been wasted.
Step Four
Cut the coil from the mandrel and slide it off. If your material went backward or wrapped over itself, no problem, simply pull it out and wrap it back up by hand to straighten it out.
Step five
Make a bunch of these and get ready for the next step.
Next up: making the rings [link]
"The Basics"
Intro
Welcome to my tutorial on how to make chainmail. This particular tutorial deals with the basics of chainmail making and is intended to help those who have little or no experience with wire and metal work get started on their very own projects. Hence, the tougher patterns will not be covered in this tutorial.
Disclaimer
This tutorial encourages and reccomends the use of machine tools such as the engine lathe and drill press. Although I offer tips on the use of the engine lathe, these tips are offered only as hints to help out those who have already been trained in the use of machine tools. No internet guide, however detailed, can be a substitute for formal training and experience. I, Colchester, or any third parties take no responsibility for any injuries, death, or disfigurement resulting from the use of their products or guides.
Getting Started
In order to get started, you're going to need a few things.
A) Lots of time. Chainmail making is tiresome and often time-consuming, so it's best to set aside lots of time if you want to get anything done. This is often very obvious, but it's so obvious it's easy to overlook it and end up quitting halfway through when you realize your project might take more time than you anticipated. Always get lots of time.
B) Wire. I reccomend Aluminium wire for those who are just starting out. It's soft, it's forgiving, doesn't rust, and most importantly it's easy to work with. Steel wire has a certain springiness to it and is difficult to cut for the newcomer. Go to your nearest hardware store and buy a reel or two of fourteen-gauge (14ga) Aluminium fencing wire. When measured with a micrometer it is 0.0625" in diameter or so, but it will vary slightly. The particular wire I am using measures exactly 0.0636" in diameter, but it doesn't make much of a difference. Just ask for fourteen gauge and make sure it says fourteen gauge. Also, make sure it's Aluminium. Starting out with steel wire can get discouraging quickly, seeing as steel is more difficult to work with. Thinner or thicker wire can get difficult faster. Thinner wire is harder to hold together, and thicker wire is harder to work with. Fourteen gauge is a nice medium. Although other metals, such as steel, bare, coated, and galvanized, stainless steel, brass, and in some cases Titanium are available, Aluminium I've found is the best all-around for costuming. It's light, it's fairly strong and holds its shape, it's easy to work with, and unlike steel, doesn't require protective oils to prevent it from rusting.
C) Wirecutters. I reccomend Channellocks, and in one of the later pictures you can see the blue handles, but unless you're going to be using them every day cutting tough materials like stainless steel and Titanium wire and need to depend on them to get your job done, or have about fifty bucks sitting around, go with the cheaper ones.
D) Pliars. You'll need two pairs of pliars. Get two of the little blunt ones without teeth, like the ones I have in the pictures. Some of them have springs, which helps make things easier.
E) An object you can use as a mandrel or an arbour. If you're going with 14 gauge wire, use a 5/16" mandrel. The smaller your mandrel is in diameter, the tighter the rings are going to be and the finer the mesh that they form, but the more difficulty you'll have putting them together. 5/16" is a nice, comfortable width and looks pretty, it's what I have pictured here, although I've worked with 3/8" and 3/16". 3/8" produces very large, loose rings, and 3/16" produces extremely tight rings. 5/16" is the minimum for 6-through-1 weave, although 6-through-1 is not going to be covered in this tutorial. Regardless, I recommend 5/16" for everyone starting out. What I have in this tutorial is premium AISI W-1 Tool Steel in its annealed condition, centerless ground. However, when you're just starting out, you don't really need to spend the extra money, so just get a piece of mild steel rod 5/16" in diameter, about two feet long. Usually this will be available at your local hardware supplier as well.
F) A variable-speed electric drill, something to turn the mandrel, or a lathe. This part is optional, but will shave hours and hours off your production, especially if you intend to create lots of chainmail, and a drill can come in handy for preparing the mandrel. What I like to do is use my lathe to turn the mandrel and let the wire coil around it. I don't reccomend that to anyone just starting out, though. Coil by hand at first, then learn to use the drill and get a thorough understanding of how it works and how finicky the process is. Don't attempt to use a lathe to coil the wire unless you've already recieved training for it and can coil the wire proficiently on a drill. If you want to satisfy your inner engineer (or want to avoid blisters and sore wrists), challenge yourself, build a crank for your mandrel and something to hold it down.
E) A small metal file and mid-grade emery cloth. This is optional, but if you want to use your chainmail as jewellry or want to avoid it snagging, you'll need it to deburr the links by grinding or filing off all sharp edges. Don't use a dremel for this, the dremel is apt to leave burrs and edges on the rings itself.
F) Somewhere comfortable to sit and work, and your imagination and creativity.
Part One: Preparing the Coils
Because of the relative simplicity of chainmail, each step you take is very important, and one of them is forming the rings. I've tried using flattened springwashers, and they don't work, they have too high a wire thickness tointernal diameter ratio, and the result is they just don't fit together. So the only alternative is to make your own.
I made these coils on a lathe, and you can see it in the next step. However, I reccomend you start coiling by hand, then by using a variable speed drill first of all. The lathe method, while awesome for producing lots of rings in a hurry, is extremely dangerous to an inexperienced user. My Colchester has fifteen horsepower driving the chuck and will not stop unless the clutch is disengaged. It could suck you in before you could do that and being pulled into a chuck being driven forward with enough power and speed to dramatically rip chunks of metal with the ease of a kid peeling a banana is not good for your health.
Step One
First get your mandrel, find the maximum, and drill a hole in it just large enough for the wire to fit through. Don't attempt to do this with a hand drill, use a proper drill press. I use a 3/32 drillbit, with a #2 center drill to create a pilot hole. When using the center drill I just touch the countersink, I never proceed up it. Once the hole is drilled, the wire can fit in it.
Step Two
This step is only mandatory if you intend to use a lathe. If you're doing this, might as well pop the extra bucks and buy tool steel instead of cold rolled steel. Keep in mind tool steel can be over three times as expensive as cold rolled steel, sometimes more. I center-drilled this using a #3 center drill. Although methods vary, I personally go no farther than halfway up the countersink when center drilling, otherwise the result is contact with the center will be minimal and excess friction on the edge and wear will be the result. But if you're using a lathe, you should recieve formal training on it.
Step Three
With the wire inserted into the hole you drilled, begin twisting. Keep the tension on the wire steady as much as you can. If you're twisting by hand, you don't need to create very long coils, as the coils tend to compress and the end result is that after you've coiled a few inches or so you'll begin to expend more energy into taking up that springiness instead of coiling the wire. Aluminium has less of this than steel, but still rebounds. I made these coils on a lathe. Again, coil by hand first, then learn to do it on a drill before you try it on something with fifteen horsepower. Keep your coils small at first and remember to strive for consistency, not speed. There's no sense in blazing through this step only to realize your rings have come out lopsided and the material has been wasted.
Step Four
Cut the coil from the mandrel and slide it off. If your material went backward or wrapped over itself, no problem, simply pull it out and wrap it back up by hand to straighten it out.
Step five
Make a bunch of these and get ready for the next step.
Next up: making the rings [link]
Image size
600x2250px 1.91 MB
© 2008 - 2024 DaveLuck
Comments5
Join the community to add your comment. Already a deviant? Log In
i've made a chainmail haubergeon out of 2.05 mm thick galvanised steel its not nice on ur hands the whole thing weighs 19 kg or 2.2 stone